Showing posts with label Lost wax artist. Show all posts

Sunday, March 1, 2026

The Raw Beauty of the Twig Weave: A 1.85ct Journey Nature, Unrefined

A matching jewelry set featuring a raw moss agate pendant and ring, with silver metal branches hand-cast directly around the stones in a prong-free design.
This signature set from the Twig Weave Collection features a rough diamond encased in organic, hand-carved silver vines. Using our "How It’s Not Made" philosophy, the metal is cast directly around the gems for maximum durability without the use of fragile prongs.


The Story of the Earth: This 1.85-carat rough diamond carries the story of the earth exactly as it was found.

One-of-a-Kind: Because nature never makes the same rough stone twice, this ring is a true one-of-a-kind treasure.

Organic Inspiration: The setting is designed to be just as raw and grounding as the diamond itself.


Beyond the Prong: You won’t see any traditional prongs here because they snag, scratch, and eventually fail.

Woven Strength: Using my signature cast-in-place method, silver twigs grow around the diamond to secure it.

Built to Last: The stone is "caged" and protected within the structure of the metal, not just sitting on top of it.


How It’s Not Made: This piece represents the movement against mass-produced, assembly-line jewelry.

Hand-Sculpted Art: I hand-sculpt every twig to follow the exact "map" of this specific diamond.

Master Artistry: With 20 years of lost wax design, my goal is for the metal to look grown, not manufactured.

Shop Twig Weave Ring


Twig Weave Pendant


Introducing the Twig Weave Collection: A Matching Set

This new set perfectly captures the spirit of nature-inspired design. Each piece is hand-carved in wax and features our signature cast-in-place technique.

The Design Philosophy: "How It's Not Made"

Most jewelry relies on thin, fragile prongs to hold a stone in place. We do things differently:

  • Integrated Strength: The metal branches are cast directly around the rough gemstone, creating a permanent bond.

  • Organic Texture: We use hand-carved details to mimic the natural ridges and patterns found in real tree bark.

  • Worry-Free Wear: Because there are no prongs to snag or bend, these pieces are built for a lifetime of daily wear.

A Perfect Match

The ring and pendant both feature raw, earthy stones encased in sterling silver vines. This set is designed for those who appreciate the raw beauty of the outdoors and want jewelry that feels as if it were found in a forest.


Monday, February 2, 2026

Nature’s Blueprint: Sculpting the Larimar Ring Through the Storm


A detailed pencil sketch of an organic jewelry design featuring a central gemstone cradled by hand-carved leaves and winding vines, signed with "DV" and the date.
Original hand-drawn blueprint for the custom
Larimar ring, featuring the signature "DV" initials and climbing vine motif.


The Journey of a Custom Design

Every piece I create begins long before I touch the wax. It starts with a conversation. I believe that jewelry should be as unique as the person wearing it, so we begin by discussing your vision—the flow, the textures, and the story you want the piece to tell.

Phase 1: The Design

Once we have the design figured out through our collaboration, the "blueprint" is set. Because I work as an artist rather than a traditional jeweler, I’m looking for a design that feels alive and organic, moving away from mass-produced looks and rigid prongs.


Phase 2: Selecting the Soul

With the design finalized, we move on to finding the right gemstone. This is one of my favorite parts to share with a client. For a recent custom Larimar ring, I presented these three options:

  • Stone A, B, and C 

By seeing the stones side-by-side on a clean palette, you can see the different "landscapes" within the Larimar. Whether you prefer a soft, misty blue or a deep, tidal pattern, this choice ensures the heart of the ring is exactly what you  envisioned.

Close-up of a jeweler’s hand using a fine-tipped heat tool to carve bark-like organic textures into a purple wax ring model on a silver mandrel.
Establishing the "Riverbend" texture on the purple wax base using a constant-heat tool set at 450°.

The Foundation of the Bezel

The Vision Takes Shape
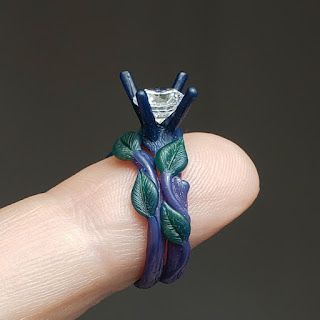
Every project begins with a conversation and a choice. For this particular adventure, my client chose "Option B": a stunning 6.2mm Larimar cabochon. 

With the stone selected, I moved into the most critical phase—creating the base ring and the bezel that will eventually secure this treasure.

The wax ring model held on a finger, showing the detailed veins of a hand-sculpted leaf and the pale blue Larimar cabochon.
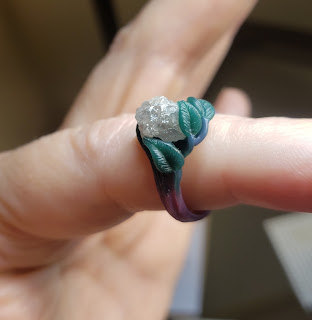
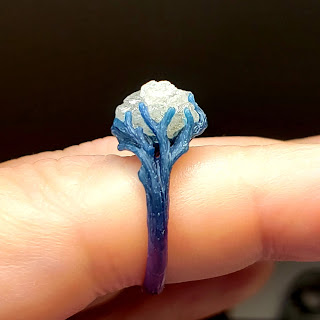
A look at the scale of the first hand-carved signature leaf against the
6.2mm Larimar setting.
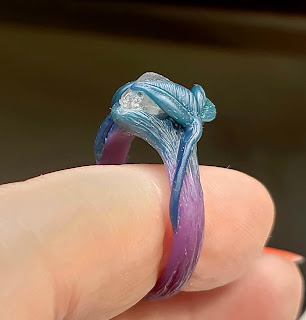
Sculpting with Heat

Using my constant-heat tool set to 450°, I began the meticulous process of shaping the purple wax on the mandrel. This isn't just a standard setting; it’s a hand-sculpted bezel to hold the Larimar gemstone. 

You can see in the latest studio shots how the heat tool allows for pinpoint accuracy as I build up the "Riverbend" texture around the stone's seat. This high-temperature stability is what allows me to create such delicate, bark-like ridges that remain structurally sound for the final casting.

The Blueprint of Nature 

As I work, I keep my original sketch close by. It serves as my map, reminding me where the signature leaves will sprout and how the vines will eventually climb to meet the bezel. Even at this early stage, the ring is no longer just wax—it's the beginning of a wearable forest.


Macro view of a purple wax ring featuring intricate winding vines and leaves cradling a central Larimar gemstone.
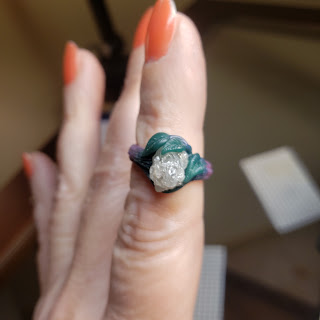
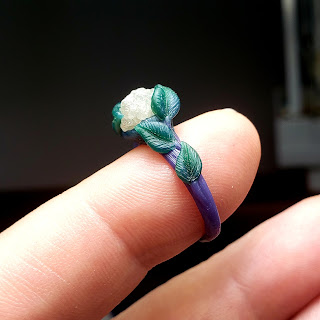
Refining the winding vines as they climb from the textured band toward the Larimar bezel.

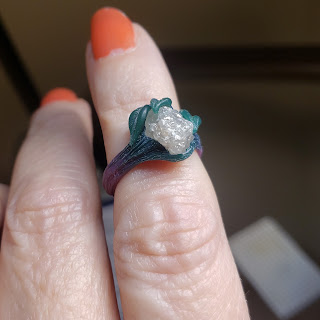
Final Phase: Prepping for the Caster

Now that the base, the bezel, and the intricate vine-work are nearing completion, the final step of the carving process is the official "DV" signature. Once that is carved into the wax, I will begin the prep work to send the model to my master jeweler for casting.

This preparation is vital to ensure that every organic detail—from the 450° heat-textured bark to the veins in the leaves—is captured perfectly when the purple wax is transformed into solid gold.

To be continued...

Friday, January 14, 2022

Lost Wax Artist - Dawn Vertrees of DV Jewelry Designs


Lost Wax Casting


Lost wax casting is a 6,000-year-old process still used in both manufacturing and fine art. 
The precision and accuracy of the process have made it an ideal method for producing objects with intricate details, and close tolerances.


Hand-sculpted wax models created to be cast using the ancient process called the Lost Wax Casting.

The wax model I sculpt using soft green, purple or blue wax is duplicated into solid metals such as 
14k or 18k Gold by using the casting process. 

My original wax jewelry models are all made by hand using a variety of tools that I have found over the years that fine tune the details in my leaves, branches and wood textures. Using this process also includes my choice of soft waxes which allows me to control my designs plus allows me the undercuts I feel my organic designs need to look more realistic.


This new design below is available to be cast in your choice of 
14k or 18k Gold in Yellow, White & Rose Gold.

3.20ct Crystal Rough Diamond
Each leaf drape over the diamond 

The stems wrap around
the edge of the diamond.
    
Details including additional pictures and prices are available,
Please click here (coming soon) to view in our Store.


Here are a couple of photos of the rings I have made which have sold or available:


Leaf, Twig & Berries Wedding Set


Friday, November 22, 2019

The Lost Wax Process and Cast-in-Place Process

I am a
Lost Wax Artist

It's not an impressive title to have but once you understand the 
process you will understand a bit better why I am called a lost wax artist
and I am so proud of it.

Lost Wax Process:

The intricate lost wax process has a rich history in our world. Also known in French as cire perdue. It is a process that allows me to hand sculpt a wax model and cast it into a unique piece of jewelry. Each cast piece is solid silver, gold or platinum once my wax model is melted out of the investment. Investment is a finer type of plaster used by jewelers and is poured around my wax model. Once the investment is dried and then heated, my wax models disappears or known as being burned out and is replaced with melted gold.

My leaf model piece above is a one-of-a-kind hand sculpted wax model that will be cast in 14k gold. Each wax model is hand sculpted to fit our rough uncut diamonds or our hand cut gemstones. We do not mass produce our jewelry, in fact because they are hand sculpted, we choose to only cast a few at a time.

I have tried many different mediums, such as clay, ArtClay, etc.. until 16 years ago, I found jewelers wax which allowed me to get details I was wanting in each piece. With different tools I was able to give my leaves, twig and vines the look I was wanting.

Once in a while I will make a rubber or silicone two-piece mold on some of my pieces which may take up to a week to create an original piece. This is needed to keep the cost down for my customers because creating original works take many hours and some clients need their rings much faster than I can sculpt them but I still insist, to this day to modify each wax model to fit my customers needs. I can also modify the wax model to make it into another unique one-of-a-kind piece.


The History: The oldest known example of this technique is a 6,000-year old amulet from Indus valley civilization. Other examples from somewhat later periods are from Mesopotamia in the third millennium B.C. and the objects discovered in the Cave of the Treasure (Nahal Mishmar) hoard in southern Israel, and which belong to the Chalcolithic period (4500–3500 BC). Conservative estimates of age from carbon-14 dating date the items to c. 3700 BC, making them more than 5,700 years old. Lost-wax casting was widespread in Europe until the 18th century, when a piece-molding process came to predominate.


Friday, April 24, 2015

Charlotte Observer - Silver & Gold, Stones & Wax


What an Honor!

I was blown away when my Mom called and said, You made it on the front page of Charlotte Style!  I was in the studio and hadn't made it out that day but once my husband came home, he was carrying a small stack of Newspapers....you could tell, he was beaming with pride. He has so much confidence in my work, LOL...probably more than I do.

It was so important for me to come back to NC to make my jewelry and then to be recognized this way, it's an amazing feeling.

I can't thank Olivia Fortson (writer) and Kiran Dodeja Smith (photographer) for visiting my studio and getting to know me and my work...what awesome people to meet.

I ofter kid around with people that I wear bunny slippers to work but Olivia was right, I actually curl up my legs in my chair looking at my mandrel, visualizing my next project, and yes...barefoot and very happy with my job.

THANK YOU CHARLOTTE, NC!!!

Friday, August 9, 2013

Sarah's Orchid Cuff - Step by Step Completed


Orchid Wax Cuff Completed...if she likes it.


____________________________________

Had a little change...

...We changed out the sesquipedales (on each side of the cuff) for the Aerangis articulata. It took some work but I totally understands her reasoning but glad we kept the main orchid, the sobennikoffia.

I can't really show off her beautiful photographs but look up the Aerangis articulata and you can see where I'm going with this.


Everything a little sharp right now...nothing has been attached, sort of laying on my frame at this point.


Making progress, all of the orchids will have a polished finish but I still have a lot of fine tuning before that can happen.

Sculpting three of these little orchids to put on 
the other side of cuff.

Working on the side of the cuff today.

I have added Orchid leaves, couple of buds and another smaller orchid to one side.
The other side is going to have a cluster of smaller orchids.

Once the whole concept is completed, I'll take all of the pieces off and fine tune every piece and add  the final detail to everything.


Fiddled with the design a bit, took the orchid off and now I'm re-sculpting it to look like a angraecoid orchid based on the photos Sarah has sent me. It has to be perfect and that's tough because I'm taking a very three dimensional flower and having to flatten it out yet have all the characteristics. I did make a little change in the design but that's why I quickly made the orchid and wanted to see it on the cuff. Great thing about wax...it allows you to melt, scrape, & cut until it's exactly like you want it.


Well so far, this was what I saw in my head...now I have to add the leaves, more buds plus add several smaller orchids to the right and left side of the center flower.

I have a lot more work to do...only about 20% completed so I'll keep you posted on the progress.


Well its time to start sculpting on Sarah's Cuff. I spent yesterday feeding my mind on orchid pictures, 
looking at stems, buds and flowers...

...so now its time to make the base of the cuff which I've decided to make based on the curly stems. I know those have a different name but "stem" is working for me at the moment. Once I make a base, I can start sculpting the orchid components...one petal at a time.

Sunday, July 1, 2012

My Third Hand for Sculpting


Sculpting in soft wax has its pluses and minuses. The plus, I love sculpting wax rather than carving hard wax with a Flexshaft that sounds like a dentist drill, annoying when you're trying to design.

Now the Minuses, because most lost wax artist, carve their waxes instead of sculpting them, they have a nice selection of tools to choose from including Turret Holders for their metal mandrels.

As a "soft wax sculptor" (that's my new title) I don't need an iron mandrel because I don't bang on wax. Fabricators bang on metal so they need a heavy mandrel plus a steady holder...I just need a holder. Plus, wood mandrels are awesome, it's lightweight and to be honest, I like the design in the wood, kind of earthy.

Another pet peeve of mine...Wolf Carving Waxes that have a Gold Color instead of the traditional ugly green & blue sheet and wire waxes that I use. My customers could visualize their jewelry a lot better if I could show them their sculpted jewelry in gold wax.

BUT, thank goodness I have a husband who's very handy with the tools & wood. He has built so many tools, holders, and benches for me. 


Work Bench Vise


What am I working on? My new Starfish and Fan Coral Cuff Bracelet


And this is Lexi, she is my Lynx Point Siamese Kitten,
always there to lend a hand.